Floor Screed Applications
Floor Screed Applications: The Foundation for Flawless and Durable Floors
Introduction: What is Floor Screed and What is its Importance in Construction?
The longevity and aesthetic success of a structure depend largely on the quality of its fundamental building elements. One such element is the floor screed. Floor screed is a thin layer composed of a mixture of cement, aggregate (sand), and water, applied over the structural concrete slab before the final floor covering (parquet, ceramic, marble, carpet, etc.) is installed.
Screed is more than just a filling material; it is a critical component of the flooring system. Its primary purpose is to eliminate level variations and imperfections on the structural concrete, creating a smooth, level, and solid surface for the final floor covering.
Key Functions of Floor Screed Applications in a Structure:
Surface Smoothness: To provide the ideal level and flatness required for the flawless installation of final coverings (especially parquet and large-format ceramics).
Level Adjustment: To eliminate height differences between different rooms or levels.
Protection and Concealment: To protect electrical, plumbing, and heating (especially underfloor heating) systems between the structural slab and the final covering.
Load Distribution: To distribute loads applied to the floor over a wider area, protecting the underlying insulation layers.
Heat Transfer: In underfloor heating systems, to uniformly transfer heat from the panels to the final floor covering.
Types of Floor Screeds and Their Applications
Different types of screeds are preferred depending on the function of the space, the required screed thickness, and the desired drying time.
1. Classification by Binder
Cement-Based Screed (Traditional Screed): The most commonly used type. It consists of a mixture of Portland cement as the binder, sand as the aggregate, and water. Generally used in all interior areas of buildings. Application thickness typically ranges between 3 cm and 5 cm.
Synthetic Screed (Polymer-Modified Screed): Created by adding polymers and chemical additives to cement-based screed. These additives increase the screed's flexibility, crack resistance, and water resistance. Used in commercial areas requiring fast drying and high strength.
Anhydrite Screed (Calcium Sulphate-Based Screed): This type of screed, with gypsum as its binder, dries faster and exhibits less shrinkage (volume loss) than cement screed. It is self-leveling but sensitive to moisture. It is often preferred for underfloor heating systems.
2. Classification by Structural Properties
| Screed Type | Description and Features | Application Area |
| Bonded Screed | Thin screed (min. 2 cm) that adheres directly to the structural concrete slab. Used where high strength is required. | Workshops, garages. |
| Unbonded Screed | A vapor barrier or separating membrane (foil) is placed between the structural slab and the screed. | Standard floors, basements with moisture risk. |
| Floating Screed | The screed "floats" on a sound/thermal insulation layer (EPS, XPS, or insulation mat) placed between the structural slab and the screed. Ideal for sound and thermal insulation. | Residential buildings, offices (the most common residential screed). |
| Self-Leveling Screed | Very fluid in structure, providing excellent surface smoothness in very thin layers (3 mm - 20 mm). | Renovation of old floors, fine corrections before final covering. |
Floor Screed Application Stages: Step-by-Step Quality Workmanship
The quality of the screed application directly affects the lifespan of the final floor covering. The application process must be meticulously followed.
1. Preparation and Cleaning
Surface Cleaning: Dust, oil, dirt, and loose particles on the structural concrete are swept and, if necessary, vacuumed.
Installation Check: Before application, the integrity and functionality of the underlying plumbing, electrical, and underfloor heating installations are checked.
Edge Strip and Insulation: In floating screed applications, impact sound insulation strips (perimeter insulation strip) are laid along all wall edges to isolate the screed from the walls and prevent sound bridges.
2. Level and Elevation Determination
Reference Points: A laser level is used to determine the highest and lowest points of the space, and reference level lines (screed guides) are marked according to the final required screed thickness for the entire floor.
Installation of Screed Guides (Battening): Guides (battens) are placed according to the determined level to ensure the flatness of the screed.
3. Preparation of the Screed Mix
Material Selection: The type and grade of cement, the aggregate (washed sand with suitable particle size distribution), and the water-to-cement ratio are determined. In traditional screed, the water/cement ratio is critical; over-watered mixes reduce strength and increase cracking.
Admixtures: Especially in underfloor heating systems, screed additive chemicals (plasticizers) that increase thermal conductivity and prevent cracking due to expansion/contraction are added to the mix.
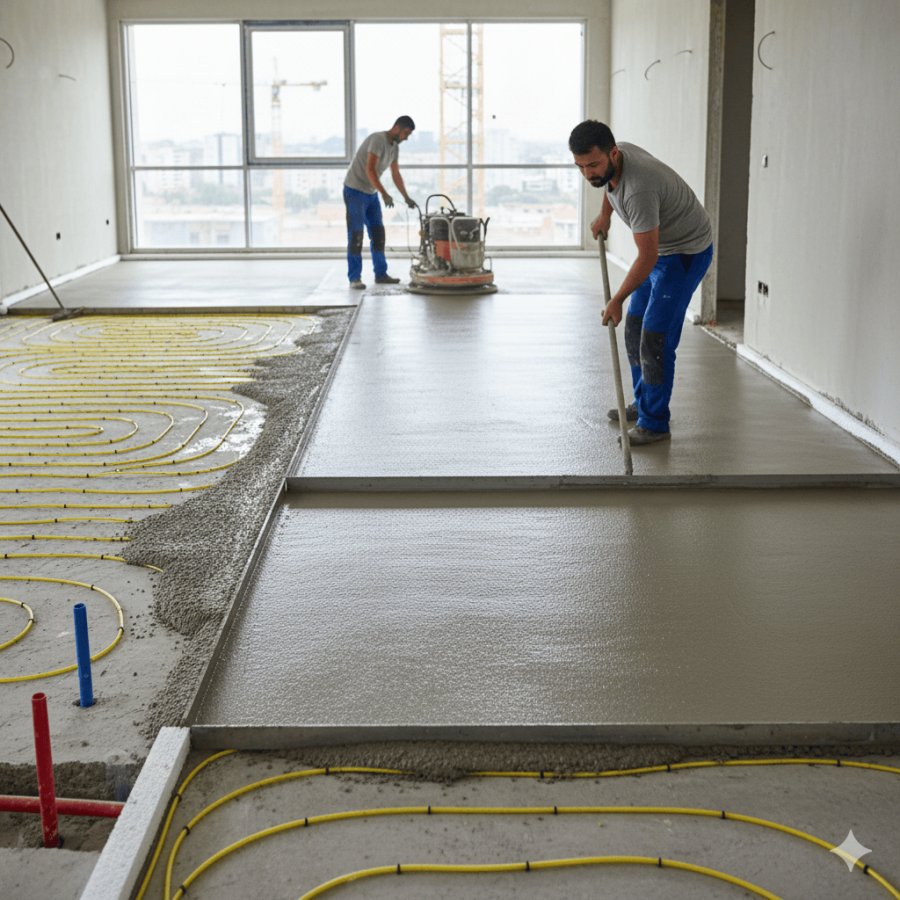
4. Application and Leveling of the Screed
Laying: The prepared screed mix is poured between the guides and roughly spread with a trowel.
Screeding (Striking off): Excess material is removed, and the surface is brought to level using long aluminum straightedges (screeds) operated by two people, guided by the reference guides. This is the most critical step for surface flatness.
Air Release (For Self-Leveling Screed): A spiked roller is used to release air bubbles that might form in the poured material of self-leveling screeds.
5. Floating and Troweling (Final Surface Treatment)
Floating (Darbying): After the screed achieves its initial set, it is lightly smoothed with a float board to remove small imperfections and improve adhesion for the final covering.
Troweling (Power Floating): If a smoother and more durable surface is desired, the surface is polished and compacted with a power trowel as the screed begins to harden further.
Key Considerations: Common Problems in Screed Applications
Common problems to avoid for a high-quality floor screed:
Cracking (Shrinkage Cracks): Occurs due to rapid drying of the screed, the use of an overly wet mix, or insufficient expansion (dilatation) joints. Low water/cement ratio and slow curing (keeping the surface moist) are essential for prevention.
Insufficient Drying: The moisture content for screed under ceramic tiles should not exceed 5%, and for screed under parquet (wood flooring), it should not exceed 2% (using the CM method). If moisture-sensitive coverings like parquet are installed before the screed is fully dry, swelling and deformation will occur.
Level Discrepancies: Level differences on the surface that exceed acceptable tolerances (usually 3 mm over a 3-meter straightedge). This is caused by faulty screeding or incorrect determination of reference levels.